
If you’re tired of bland, store-bought bread crumbs that taste like cardboard, I completely understand your frustration. Learning how to make bread crumbs at home is one of those simple kitchen skills that transforms your cooking overnight. I promise you’ll never buy pre-packaged crumbs again once you taste the difference—and in this guide, I’ll walk you through everything you need to know to create perfectly crispy, golden bread crumbs in your own kitchen.
Why Make Homemade Bread Crumbs?
Store-bought bread crumbs often contain preservatives, anti-caking agents, and lack the authentic flavor that makes dishes truly special. When you make your own bread crumbs, you control every ingredient and can customize the flavor profile to match your cooking style. Whether you’re topping a casserole, breading chicken, or finishing a salad, homemade bread crumbs deliver superior texture and taste.
The best part? This recipe uses bread you probably already have at home. That slightly stale sourdough, whole wheat loaf, or crusty Italian bread becomes liquid gold in your kitchen. Plus, homemade bread crumbs keep beautifully for months when stored properly.
Homemade Bread Crumbs Recipe Card
| Prep Time | 10 minutes |
| Cook Time | 15-20 minutes |
| Servings | 2-3 cups |
| Difficulty Level | Beginner |
| Estimated Calories | 30 per tablespoon |
Ingredients for Homemade Bread Crumbs
Main Ingredients:
- 3-4 cups stale bread, cut into 1-inch cubes (sourdough, whole wheat, or Italian bread work best)
- 2 tablespoons olive oil (optional, for extra golden crumbs)
- ½ teaspoon salt
- ¼ teaspoon black pepper
Optional Italian-Style Seasonings:
- 1 teaspoon dried Italian herbs
- ½ teaspoon garlic powder
- ½ teaspoon onion powder
- ¼ teaspoon red pepper flakes (for a subtle kick)
- 2 tablespoons grated Parmesan cheese
Vegan & Gluten-Free Substitutes:
- For Vegan: Skip the Parmesan or use nutritional yeast for a cheesy flavor
- For Gluten-Free: Use certified gluten-free bread in place of regular bread
- Dairy-Free Option: Substitute Parmesan with cashew parmesan or omit entirely
Step-by-Step Instructions for Making Bread Crumbs
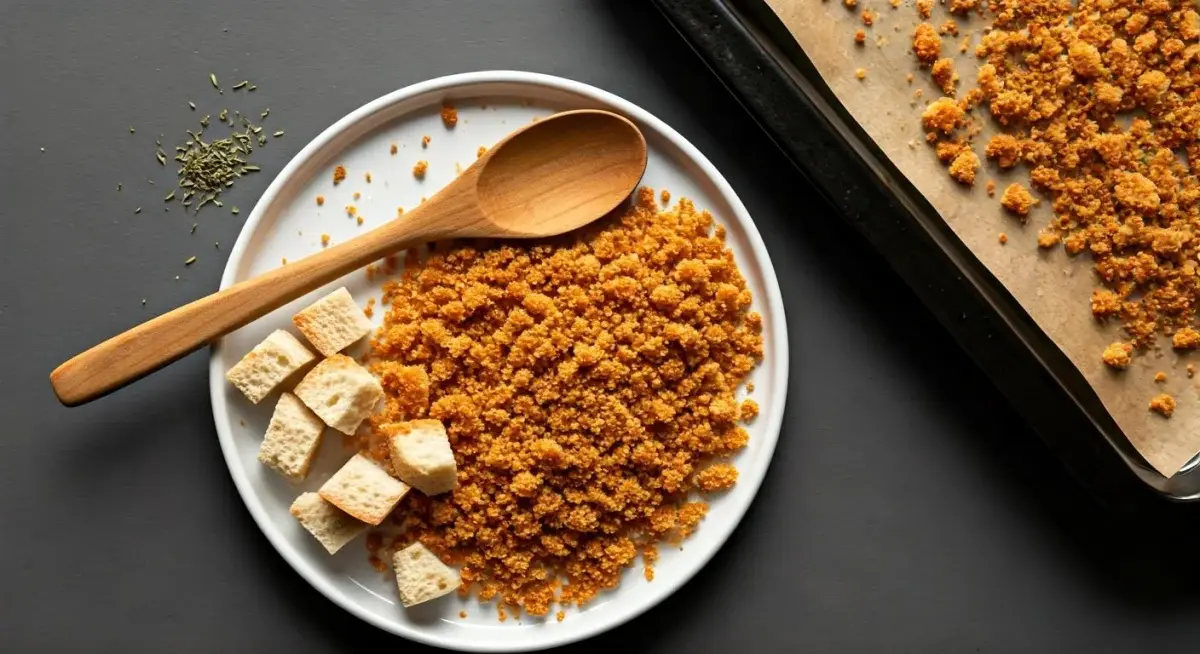
- Prepare Your Bread: Start with bread that’s at least 1-2 days old. Fresh bread will create mushy crumbs rather than crispy ones. Cut the bread into 1-inch cubes, removing any extremely hard crusts if desired (though crusts make excellent crumbs).
- Dry the Bread: Spread bread cubes on a large baking sheet in a single layer. Bake at 300°F (150°C) for 10-12 minutes, stirring halfway through, until the bread is completely dried out and lightly golden. This step is crucial for achieving that perfect crunch.
- Cool Completely: Remove from the oven and let the bread cool for 5 minutes. This prevents condensation that can make your crumbs soggy.
- Blend into Crumbs: Transfer cooled bread cubes to a food processor. Pulse 8-10 times until you reach your desired crumb size. For fine crumbs, blend longer; for panko-style crumbs, pulse fewer times.
- Add Seasonings (Optional): If making Italian-style bread crumbs, add dried Italian herbs, garlic powder, onion powder, and Parmesan cheese. Pulse 2-3 more times to combine evenly.
- Toast for Extra Flavor: For enhanced crispiness and deeper flavor, spread the crumbs on a baking sheet and toast at 325°F (163°C) for 3-5 minutes, stirring frequently. Watch carefully to prevent burning.
- Store Properly: Allow crumbs to cool completely, then transfer to an airtight container. Store in a cool, dry place for up to 3 months, or refrigerate for extended freshness.
Chef’s Pro Tips for Perfect Bread Crumbs
1. The Staleness Secret
Never underestimate the power of stale bread when learning how to make bread crumbs. Fresh bread contains too much moisture and will create dense, chewy crumbs instead of crispy ones. Let your bread sit uncovered for 1-2 days, or speed up the process by toasting fresh bread at 250°F for 10 minutes before drying completely.
2. The Two-Stage Drying Method
The difference between mediocre and exceptional bread crumbs lies in proper drying. First, dry the bread cubes in the oven to remove all moisture. Then, after blending, give the crumbs a quick toast for 3-5 minutes. This two-stage approach creates crumbs with superior crunch and a deeper, more complex flavor that elevates any dish.
3. The Flavor Customization Hack
While Italian seasoning is classic, don’t limit yourself. For Asian-inspired dishes, add sesame seeds and a touch of ginger powder. For Mexican flavors, blend in cumin and chili powder. For French cuisine, mix in fresh thyme and a hint of lemon zest. Make multiple batches with different seasonings and label them clearly for maximum kitchen versatility.
Frequently Asked Questions About Homemade Bread Crumbs
Can I use fresh bread to make bread crumbs?
While technically possible, fresh bread won’t give you the crispy texture you want. Fresh bread has too much moisture and will create dense, soggy crumbs. Always use bread that’s at least 1-2 days old, or toast fresh bread first to remove excess moisture before processing.
How long do homemade bread crumbs last?
Properly stored bread crumbs keep for up to 3 months in an airtight container at room temperature. For maximum longevity, store them in the refrigerator where they’ll stay fresh for 4-6 months. You can also freeze them for up to a year—just thaw before using.
What’s the difference between panko and regular bread crumbs?
Panko crumbs are larger and coarser, creating extra-crispy coatings on fried foods. Regular bread crumbs are finer and pack more densely. To make panko-style crumbs, pulse your dried bread fewer times in the food processor. For regular crumbs, process longer until you reach a fine, uniform texture.
Creative Ways to Use Your Homemade Bread Crumbs
Once you’ve mastered making bread crumbs, the possibilities are endless. Use them to top casseroles, coat chicken or fish, thicken soups, or add crunch to salads. The Italian-seasoned version is perfect for meatballs and pasta dishes. Sprinkle unseasoned crumbs over gratins, mac and cheese, or vegetable bakes for a golden, crispy finish.
For more inspiration on breadcrumb applications, check out Food & Wine’s breading techniques and explore Serious Eats’ coating methods for professional results.
Learning how to make bread crumbs is a game-changer for home cooks. You’ll save money, reduce waste, and create superior dishes with better flavor and texture. Your kitchen will smell like a professional restaurant, and your family will taste the difference immediately. Start with that stale bread sitting on your counter—it’s about to become your secret ingredient to culinary success.